


Hetzner Robot
Hetzner Rescue System: how to boot it and recover files
The Rescue System boots on the server over the network and runs in memory. You use it to install a system, reset a password and retrieve files when the server does not boot from its own disks.
In short
- Rescue does not erase data: it runs in memory, and you mount the disks yourself. Only installing a system and disk partitioning commands erase them.
- To enable it, open Serveryour serverRescue, choose Linux, click the activation button and save the password. Then reboot the server within 60 minutes.
- To log in, run
ssh root@IP-addresswith the Rescue password. You mount disks with themountcommand and copy files withscp,rsyncor WinSCP. - To leave, run
reboot, and the server boots from its own disks.
Contents
- What Rescue is and why it does not erase your files
- A new server was delivered in Rescue: what it means
- How to enable Rescue
- How to mount the disks and find your files
- How to copy the files
- How to check that the files were copied
- How to repair the system through chroot
- How to exit Rescue
- If something goes wrong
- FAQ
You will need
- Your ABCD login for Robot, which is in the server delivery ticket: how to log in to Robot.
- An SSH client: Windows 10 and 11, macOS and Linux already have one. How to connect via SSH.
- Somewhere to put the files: your own computer or another server. And about 20 minutes, while the server is in Rescue and the sites on it are down.
- No server yet? See Hetzner servers in our catalog.
What Rescue is and why it does not erase your files
The Rescue System is a small Linux that Hetzner boots on the server over the network. It runs entirely in memory and does not touch the server’s disks: the files on them stay as they were until you start working with them yourself (Rescue in the Hetzner documentation).
Hence the rule: anything you save inside Rescue itself disappears after a reboot. Copy files to the server’s disk or to another computer.
You need Rescue when:
- the server does not boot, and you need to retrieve files or see what broke;
- the root password is forgotten: how to reset the password;
- you need to install Linux, including with RAID and your own partitioning: installimage;
- you need to check the disks: disks and RAID.
If you need to see the server’s screen, for example to enter the BIOS, you will need a KVM console.
Installing a system and partitioning commands erase the data on the disks. In Rescue, these are installimage, wipefs, mkfs, fdisk and parted. If your goal is to save files, do not run them until you have copied everything you need.
A new server was delivered in Rescue: what it means
We deliver some servers booted into the Rescue System: no system is installed on the disks yet, and Rescue is there so that you can install one. Log in via SSH with the password from the delivery ticket and install a system: how to install Linux.
Simply rebooting such a server is no use. Rescue boots once, and the server has nothing to boot from on its own disks yet. If you have already rebooted it and it has dropped off the network, enable Rescue again following the steps below.
How to enable Rescue
Open the Rescue tab
Log in to Robot and open Serveryour serverRescue.
Choose Linux and how you will log in
Under Operating system, select the Linux option marked stable, currently Linux (Debian Trixie/stable). Do not choose the vKVM options: this guide is for Linux. There is no need to change Keyboard layout.
If the form lets you choose an SSH key and your key is there, select it, and you will log in without a password. If there are no keys, Robot gives you a password. You add keys in Robot with the Key management button above the server list.
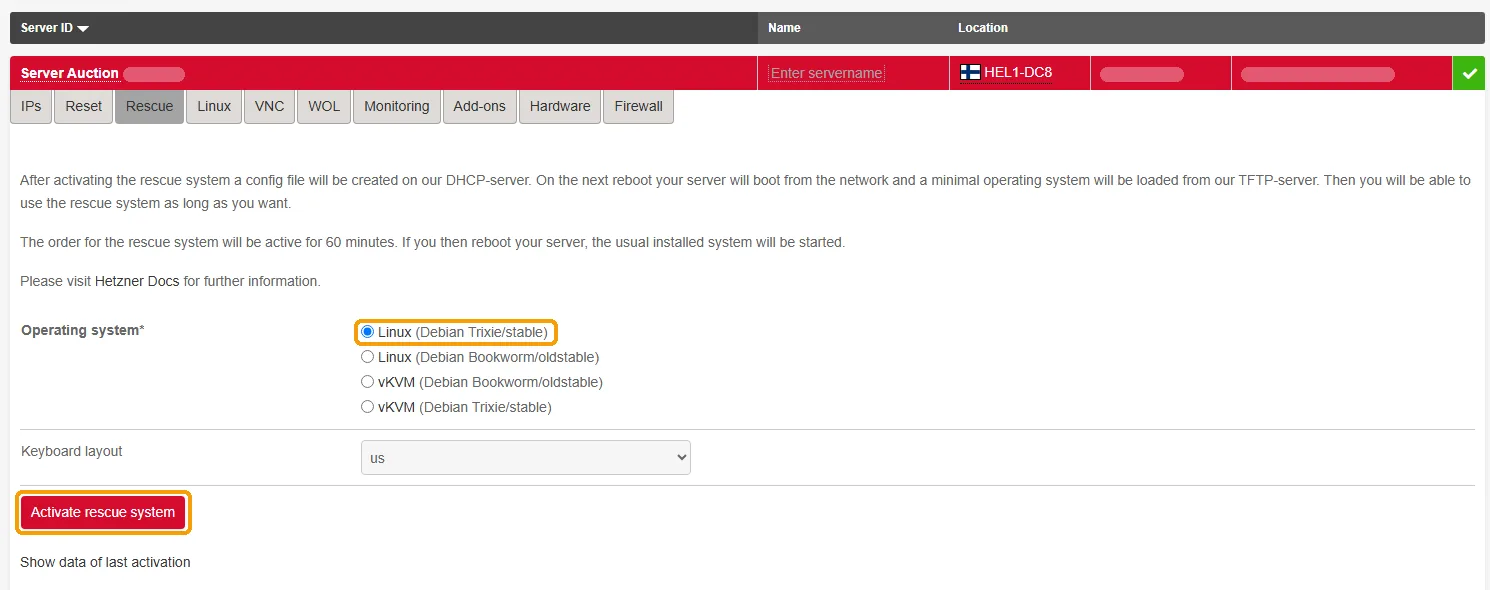
Leave the Linux option marked stable and click Activate rescue system Enable Rescue and save the password
Click Activate rescue system. Robot shows the root password for Rescue: copy it right away, while the page is still open. This password works only for Rescue, not for the system on the disks.
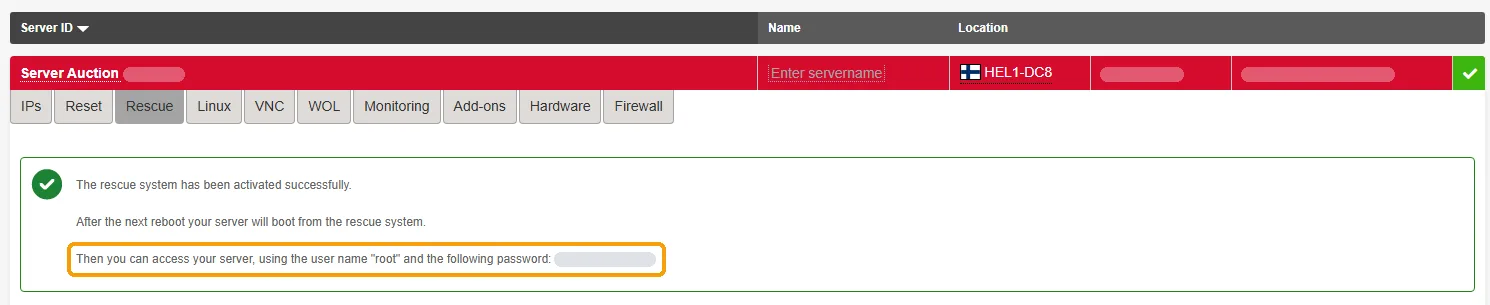
Robot shows the Rescue password after activation: copy it right away Reboot the server within 60 minutes
Enabling Rescue only schedules it to boot the next time the server starts. If the server responds via SSH, reboot it with the
rebootcommand; if not, use a hardware reset on the Reset tab (how to reboot the server).If you do not reboot the server within 60 minutes, the activation is cancelled automatically, and the server boots from its own disks as usual.
Connect via SSH
When the server has rebooted, connect as root with the Rescue password:
ssh root@203.0.113.10Replace 203.0.113.10 with your server’s main IP address. If you have connected to it before, SSH warns that the server key has changed:
REMOTE HOST IDENTIFICATION HAS CHANGED. That is expected: Rescue has its own key. Remove the old key from the list of known hosts and connect again:ssh-keygen -R 203.0.113.10
You are in Rescue, and you can now mount the disks.
How to mount the disks and find your files
The commands in this section run on the server, in Rescue.
List the disks and partitions
lsblk -o NAME,SIZE,TYPE,FSTYPEThe command shows the disks, partitions and RAID arrays. Sample output for two NVMe disks in software RAID 1:
NAME          SIZE TYPE  FSTYPE
nvme0n1       477G disk
├─nvme0n1p1     4G part  linux_raid_member
│ └─md0         4G raid1 swap
├─nvme0n1p2     1G part  linux_raid_member
│ └─md1      1022M raid1 ext4
└─nvme0n1p3   472G part  linux_raid_member
  └─md2       471G raid1 ext4
nvme1n1       477G disk
├─nvme1n1p1     4G part  linux_raid_member
│ └─md0         4G raid1 swap
├─nvme1n1p2     1G part  linux_raid_member
│ └─md1      1022M raid1 ext4
└─nvme1n1p3   472G part  linux_raid_member
  └─md2       471G raid1 ext4
Your files are almost always on the largest partition or array,
md2in the example. The FSTYPE column tells you what to do next:linux_raid_memberis part of a RAID,LVM2_memberis LVM, andext4orxfscan be mounted right away.If there is RAID, check that it is assembled
cat /proc/mdstatIf the output lists
mdarrays, you can mount them. If there arelinux_raid_memberpartitions but no arrays, assemble them:mdadm --assemble --scanIf the system is on LVM, activate the volumes
If FSTYPE shows
LVM2_member, activate the logical volumes and look at their names:vgchange -ay ls /dev/mapper/The system volume is usually named something like
vg0-root.Mount the partition read-only
mount -o ro /dev/md2 /mnt
ls /mnt
The
-o rooption mounts the partition read-only, so nothing on it changes while you copy. Replace/dev/md2with your own: a partition without RAID, such as/dev/nvme0n1p3or/dev/sda3, or an LVM volume like/dev/mapper/vg0-root. If/mntshows theetc,homeandvarfolders, you have mounted the system.To fix something on the disk, such as resetting a password or correcting settings, mount the partition without
-o ro.
A Windows disk (NTFS)
In the lsblk output, the Windows partition is marked ntfs; it is usually the largest partition on the disk. Mount it read-only as well:
mount -o ro /dev/nvme0n1p2 /mnt
ls /mnt
If you see the Users and Windows folders, the partition is mounted, and the users’ files are in /mnt/Users. If mount returns an error, message us and include its text.
Once the partition is mounted, you can copy files from it.
How to copy the files
Rescue accepts SSH connections, so you can pull the files to your computer in any of the ways below. The password is always the Rescue password, and the disk’s files are in /mnt.
To a computer with Windows, macOS or Linux, use the scp command. You run it on your own computer: in PowerShell on Windows 10 and 11, in Terminal on macOS and Linux. Example: copy the websites folder into a www-backup folder:
scp -r root@203.0.113.10:/mnt/var/www ./www-backupLarge folders on macOS and Linux are easier to copy with rsync: if the connection drops, running it again picks up where it stopped.
rsync -avP root@203.0.113.10:/mnt/home/ ./home-backup/With the mouse, in WinSCP or FileZilla. Protocol SFTP, address: the server’s IP, port 22, user root, the Rescue password.
Straight to another server: this is faster when there is a lot of data, since the link between data centers is usually wider than a home connection. This command runs in Rescue:
rsync -avP /mnt/var/www/ root@198.51.100.20:/backup/www/What to copy first
/mnt/homeand/mnt/root: the files of the users and of root;/mnt/var/www: websites, if they are in the usual place;/mnt/etc: system and application settings, useful when you reinstall;/mnt/var/lib/mysqlor/mnt/var/lib/postgresql: database files. Copy the whole folder and later run it with the same version of MySQL or PostgreSQL.
Until the copying has finished, do not close the terminal window or reboot the server.
How to check that the files were copied
Compare the size of the folder on the server and on your side. On the server, in Rescue:
du -sh /mnt/var/wwwOn your side, look at the folder size in its properties (Windows) or run the same command, du -sh ./www-backup (macOS and Linux). The numbers should almost match. Then open a couple of files, for example a site’s settings or a document, and make sure they are readable.
How to repair the system through chroot
To repair the system itself, for example to change a password or fix the network and SSH settings, enter it from Rescue with chroot. Mount the partition for writing:
mount /dev/md2 /mnt
chroot-prepare /mnt
chroot /mnt
chroot-prepare mounts the system folders that many commands need to work, and chroot switches you into the system on the disk. From then on, your commands act on that system: this is how you reset the root password, for example. To return to Rescue, run exit.
How to exit Rescue
Run the reboot command in Rescue. Rescue is enabled for one boot only, so the server boots from its own disks, and you do not need to click anything in Robot.
rebootAfter the boot, SSH warns about a changed server key again: now your own system is answering with its own key. Remove the key with ssh-keygen -R, as when you logged in to Rescue, and log in with your system’s password.
If something goes wrong
| What you see | What to do |
|---|---|
Permission denied, please try again. | SSH did not accept the password. Copy the Rescue password again, with no spaces at either end: the password of the system on the disks does not work for Rescue. If the Rescue password is lost and the server is already in Rescue, enable Rescue again on the Rescue tab and reboot the server: Robot will show a new password. |
WARNING: REMOTE HOST IDENTIFICATION HAS CHANGED! | Rescue has a different server key, and that is normal. Run ssh-keygen -R with your IP address and connect again. |
Connection timed out or Connection refused | The server is still booting: wait a couple of minutes. If there is still no response, enable Rescue again and reboot the server right away with a hardware reset on the Reset tab. |
| The server booted into its own system, not into Rescue | More than 60 minutes passed between enabling Rescue and the reboot, or there was no reboot. Enable Rescue again and reboot the server right away. |
mount: /mnt: unknown filesystem type 'linux_raid_member'. | You are mounting part of a RAID. Mount the /dev/md… array instead, and if there is none, run mdadm --assemble --scan first. |
mount: /mnt: unknown filesystem type 'LVM2_member'. | The partition belongs to LVM. Run vgchange -ay and mount a volume from /dev/mapper/. |
| Robot does not open from your network | This is a restriction on your internet provider’s side. Message us in a ticket or on Telegram: we will enable Rescue, reboot the server and tell you how to log in. |
If Rescue did not help you find the cause and the server still does not boot, you need the server’s screen: how to get a KVM console.
FAQ
Will Rescue erase my files?
Does the Rescue password work for my system?
Can I install Windows from Rescue?
Did this guide help?
Thank you! This tells us which guides work.
What went wrong?
Tell support at which step you got stuck and include the link to this guide, so you don’t have to explain from scratch.