


Hetzner Robot
Hetzner installimage: software RAID, LVM, custom partitions
installimage installs Linux exactly as its settings file describes: on which disks, with which RAID and which partitions. By editing the file, you build RAID 0, 1, 5, 6 or 10, turn on LVM or install the system without a separate /home partition.
In short
- The disks are set by the
DRIVE1,DRIVE2and following lines: every disk listed will be wiped. Comment out a disk you need to keep with#. - RAID is turned on by the
SWRAID 1line, andSWRAIDLEVELsets the level: 0, 1, 5, 6 or 10. RAID 0 does not survive the failure of even one disk. - Partitions are set by
PARTlines, LVM volumes byLVlines. For no separate /home, make the rootPART / ext4 allthe last partition. - If the installation fails with an error, save
/root/debug.txtbefore rebooting and send it to us: we pass it on to Hetzner.
Contents
You will need
- The server in the Rescue System and an SSH login to it: the first steps are in the article on reinstalling Linux on a Hetzner server.
- A copy of the data you need: every disk on the DRIVE lines will be wiped.
- 20–30 minutes.
When you need custom partitioning
For a regular reinstall, the default settings that installimage suggests are enough. You need to change them if:
- you need a different RAID level: a RAID 1 mirror, RAID 10 on four disks, or RAID 0 for the full capacity;
- the system must go on specific disks, for example on NVMe, while the HDDs stay for data;
- you do not need a separate /home partition and want all the space to go to the root;
- you need LVM, for example for Proxmox VE.
You can also write these wishes in the Comment field of the order window when you order a server: then our team installs the system with the partitioning you need before delivering the server.
How to change the installimage settings
installimage completely wipes every disk on the DRIVE lines. Copy the data you need before you start. If the server has a disk that must not be touched, check once more before saving the settings that its line is commented out.
Connect to Rescue via SSH
Activate Rescue in Robot, reboot the server in the Reset tab and log in as root with the Rescue password. The steps are described in the article on reinstalling Linux.
See which disks the server has
lsblk -d -o NAME,SIZE,ROTASample output for a server with two HDDs and two NVMe disks:
NAME SIZE ROTA sda 3.6T 1 sdb 3.6T 1 nvme0n1 953.9G 0 nvme1n1 953.9G 0NAMEis the disk name,ROTAits type: 1 for HDD, 0 for SSD and NVMe. In the installimage settings, the name gets/dev/in front:/dev/sda,/dev/nvme0n1. For RAID, use disks of the same size: the array uses the capacity of the smaller one.Stop the old RAID and wipe the partitioning
If the disks already had a system, Hetzner recommends stopping the old arrays and wiping the partition signatures before the installation. In
wipefs, list only the disks the system will go on:mdadm --stop /dev/md* wipefs -fa /dev/nvme0n1 /dev/nvme1n1If there is nothing to keep, you can wipe all disks of one type at once:
wipefs -fa /dev/nvme*n1orwipefs -fa /dev/sd*. Do not include a data disk you want to keep in this command.Run installimage and choose an image
installimageChoose the distribution and version in the menu. The editor then opens with the settings file: from here on, you edit lines in it.
Set the disks on the DRIVE lines
The installer fills in every disk it finds:
DRIVE1,DRIVE2and so on. Each of them will be wiped. To leave a disk untouched, put#at the start of its line and renumber the remaining ones so that the numbers run in order from 1. For example, the system goes on two NVMe disks, and two HDDs stay as they are:DRIVE1 /dev/nvme0n1 DRIVE2 /dev/nvme1n1 #DRIVE3 /dev/sda #DRIVE4 /dev/sdb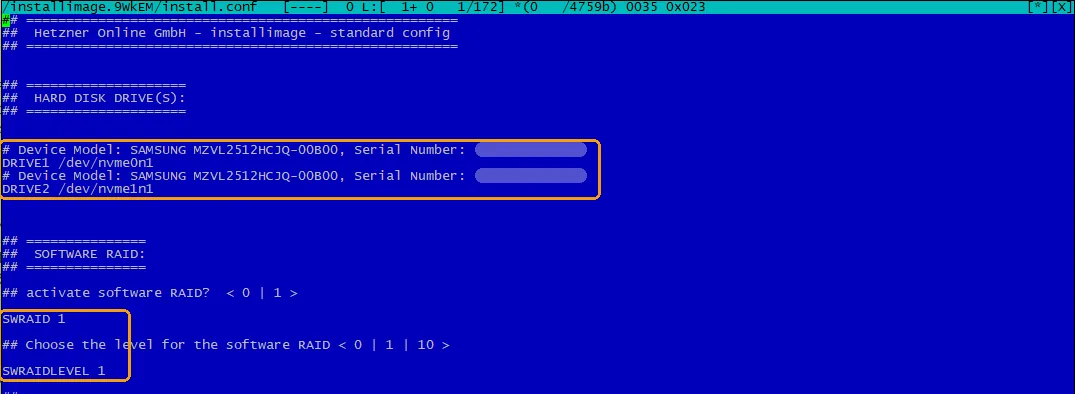
The start of the file on a server with two NVMe drives: both disks are on DRIVE lines, RAID 1 is on. Turn on RAID and choose the level
SWRAID 1 SWRAIDLEVEL 1SWRAID 1builds software RAID across all disks on the DRIVE lines;SWRAID 0installs the system without RAID. Set the level inSWRAIDLEVEL:Level Disks Usable capacity If a disk fails 0 2 or more the sum of all disks all data is lost 1 2 or more the capacity of one disk the server keeps running as long as at least one disk is intact 5 3 or more all disks but one survives the failure of one disk 6 4 or more all disks but two survives the failure of two disks 10 4 or more half of all disks survives the failure of one disk in each pair If the server has a hardware RAID controller, the array on it is created before you run installimage, and the installer sees it as a single disk.
Describe the partitions with PART lines
Each
PARTline is one partition: mount point, file system and size. The size is written with a unit:1024M,8G. The wordallmeans “all remaining space”, and such a partition goes last. A simple layout without a separate /home:PART /boot ext3 1024M PART swap swap 8G PART / ext4 allHere
/bootis the boot loader partition,swapis the swap partition in case memory runs short, and the root/takes everything else. If the file has aPART /boot/efi esp 256Mline, do not delete it and keep it first among the PART lines: it is needed for UEFI boot. Partitions larger than 2 TiB are only possible with GPT partitioning, and so only with a system that boots via GRUB2.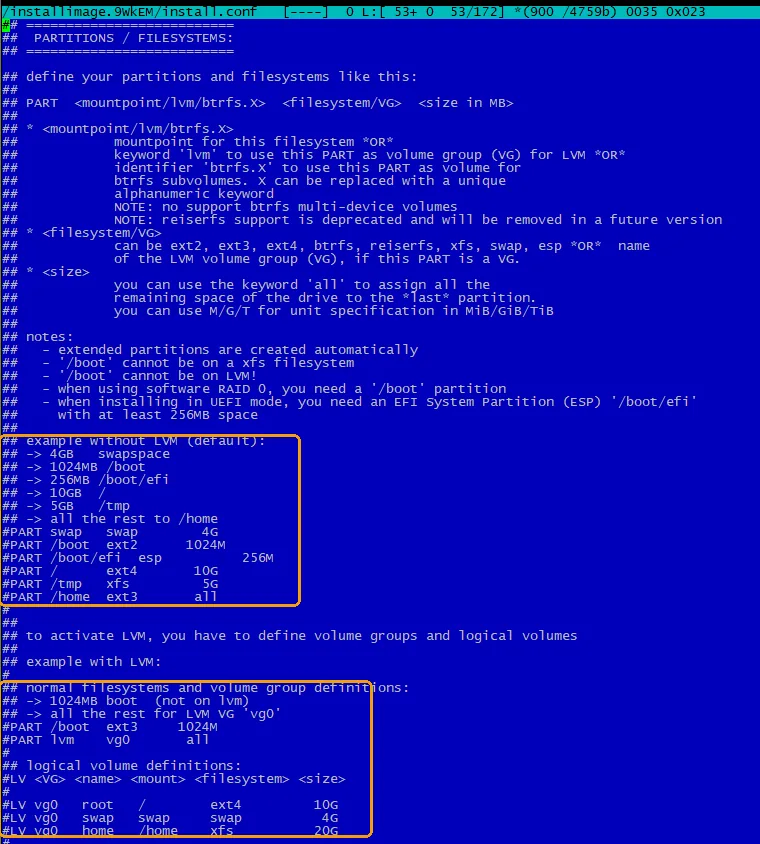
The file itself has partitioning examples with and without LVM in its comments. The partition sized all comes last among the PART lines. Enter the server name
HOSTNAME server.example.comIt is best to give the name as name.domain. Proxmox VE, for example, requires exactly this kind of name.
Save the settings and start the installation
F2 saves the file, F10 closes the editor. If the F keys do not work (this happens on a Mac), press Fn+F2 and Fn+F10, or Esc, then 2, and Esc, then 0. installimage checks the syntax and takes you back to the editor if there is a mistake. If everything is correct, confirm the data deletion and wait for the
INSTALLATION COMPLETEmessage.Reboot and check the RAID
rebootLog in to the new system with the same password as Rescue and check the state of the arrays:
cat /proc/mdstat lsblkEach array shows its level (
raid1,raid10) and its disks. EachUis a working disk:[UU]for a two-disk array,[UUUU]for four disks; an underscore in place of aUmeans a disk is missing from the array. Aresyncline means the array is syncing the disks in the background: this is normal, and you do not have to wait for it to finish.
If something went wrong, start with the section “If the installation failed” below.
Ready-made settings for common cases
The blocks below replace the lines of the same name in the installimage file. Take the disk names from the lsblk output. If there is a PART /boot/efi line, keep it first among the PART lines.
RAID 1 on two disks, without /home
DRIVE1 /dev/nvme0n1
DRIVE2 /dev/nvme1n1
SWRAID 1
SWRAIDLEVEL 1
HOSTNAME server.example.com
PART /boot ext3 1024M
PART swap swap 8G
PART / ext4 allIf one disk fails, the server keeps running, and the disk can be replaced. How to check the disks and order a replacement.
RAID 10 on four disks
DRIVE1 /dev/sda
DRIVE2 /dev/sdb
DRIVE3 /dev/sdc
DRIVE4 /dev/sdd
SWRAID 1
SWRAIDLEVEL 10
HOSTNAME server.example.com
PART /boot ext3 1024M
PART swap swap 8G
PART / ext4 allHalf the capacity goes to copies, but the array survives a disk failure and is faster than RAID 1 on two disks.
RAID 0: full capacity, no protection
SWRAID 1
SWRAIDLEVEL 0If any disk in a RAID 0 array fails, the data on all disks of the array is lost. Choose it only if you have copies elsewhere or can afford to lose the data.
System on NVMe, HDDs left untouched
DRIVE1 /dev/nvme0n1
DRIVE2 /dev/nvme1n1
#DRIVE3 /dev/sda
#DRIVE4 /dev/sdb
SWRAID 1
SWRAIDLEVEL 1The HDDs keep their existing data. You can partition them for new tasks from the installed system.
LVM: 100 GB root, the rest left free
PART /boot ext3 1024M
PART swap swap 8G
PART lvm vg0 all
LV vg0 root / ext4 100G
PART lvm vg0 all gives all remaining space to an LVM volume group named vg0. LV vg0 root / ext4 100G creates a 100 GB volume root in it for the system root. The rest of vg0 stays free: you can give it to virtual machine disks or new volumes. This is the layout used in the article on Proxmox VE on Hetzner.
One disk without RAID
DRIVE1 /dev/nvme0n1
SWRAID 0
Comment out the other disks if you need to keep them, or leave them in the list if they can be wiped.
If the installation failed
| What you see | What to do |
|---|---|
| After F10, installimage opens the editor again | The installer found a mistake in the settings. Check the lines you changed: disk names, DRIVE numbers in order from 1, the all partition last, size units. |
| The installation stopped with an error | Run installimage again. If the error repeats, save /root/debug.txt as described below and send it to us. |
| Ubuntu 18.04 or 20.04 will not install with XFS | These versions cannot create XFS in the current Rescue System. Choose ext4 or a newer Ubuntu version. |
| After the reboot the server does not respond for more than 10 minutes | Activate Rescue, reboot the server and check the settings. If Rescue does not boot, ask for a KVM console to see the screen: how to get a KVM console. |
When an error occurs, the installer writes a detailed log to the file /root/debug.txt. The Rescue System runs in memory, so the file is gone after a reboot. Save it beforehand. The easiest way is to download the file to your computer: run this command in a terminal on your computer, not on the server.
scp root@203.0.113.10:/root/debug.txt .The file appears in the folder you ran the command from. You can also print the end of the log on the screen and copy the text:
tail -n 100 /root/debug.txtSend the file or the text in a ticket together with the error the installer showed and your DRIVE, SWRAID and PART lines. The Robot login from ABCD cannot open a ticket with Hetzner, so we pass the log on to Hetzner.
FAQ
RAID 0 or RAID 1 on two disks?
How do I install the system without a /home partition?
PART / ext4 all, and delete the line with /home. Then all the space after /boot and swap goes to the root.Can I reinstall the system and keep the data on one of the disks?
wipefs command.I see resync in /proc/mdstat. Is that an error?
Did this guide help?
Thank you! This tells us which guides work.
What went wrong?
Tell support at which step you got stuck and include the link to this guide, so you don’t have to explain from scratch.