


Hetzner Robot
Proxmox VE on Hetzner: install, bridge and additional IPs
Proxmox VE 9 goes on a Hetzner server on top of Debian 13: first installimage with RAID 1 and LVM, then the packages from the official Proxmox repository. The network for virtual machines is routed on the server itself, because Hetzner treats traffic from MAC addresses other than the server’s as a violation.
In short
- The order: Rescue →
installimagewith Debian 13, RAID 1 and LVM → the Proxmox repository → the Proxmox kernel → theproxmox-vepackage. The web interface opens athttps://server-IP:8006. - Do not bridge VMs to the server’s network card: each VM has its own MAC, and Hetzner treats traffic from other MACs as a violation and may block the server.
- The safe setup is routed: a
vmbr0bridge with no physical port, a route to each additional IP, and the server’s main IP as the gateway inside the VM. - The installation wipes the disks. Additional IPs and subnets are ordered through us.
Contents
- How the installation works
- Install Debian 13 with RAID 1 and LVM
- Prepare Debian: password, RAID and server name
- Install Proxmox VE 9 from the official repository
- Why you must not bridge VMs to the network card
- Set up a routed network for additional IPs
- Create a VM and set the IP inside it
- If you have a subnet instead of single IPs
- More VMs than IPs: internet access through NAT
- If something does not work
- FAQ
You will need
- The Hetzner Robot login from ABCD and an SSH client: how to connect via SSH.
- Additional IPs or a subnet for the VMs: we order them for you when you ask in a ticket (how to order additional IPs).
- 30–40 minutes and a copy of your data: the installation wipes the disks.
- No server yet? See Hetzner servers: you can choose Proxmox VE in the order window, and we install it before delivering the server.
How the installation works
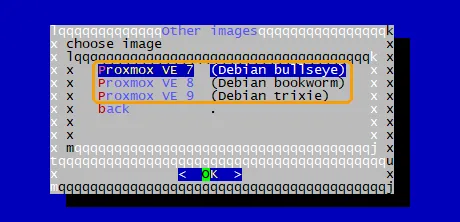
Hetzner has no official Proxmox image. The installimage menu has Proxmox VE 7, 8 and 9 images under Other, but the whole item is marked !!NO SUPPORT!!: Hetzner does not support these images. So in this article installimage first installs a clean Debian 13: it sets up the disks, the boot loader and the server network itself. Then Proxmox VE 9 is installed on top of Debian from the official repository. This method is described in the Proxmox documentation and in a Hetzner Community tutorial, and it does not need a KVM console.
The example below uses a server with two NVMe disks, the main IP 203.0.113.10 in the 203.0.113.0/26 network and three additional IPs: 203.0.113.20, 203.0.113.21 and 203.0.113.22. Use your own addresses. Commands run over SSH as root; copy the blocks whole.
Install Debian 13 with RAID 1 and LVM
installimage completely wipes both disks. If the server has data you need, copy it before you start.
Boot the server into Rescue and connect via SSH
In Robot, open Serveryour serverRescue, choose Linux, activate Rescue and save the password. Then reboot the server in the Reset tab with a hardware reset. After 2–3 minutes, connect:
ssh root@203.0.113.10These steps are covered in more detail in the article on reinstalling Linux on a Hetzner server.
Run installimage and choose Debian 13
installimageIn the menu, choose Debian, then the image with trixie in its name: that is Debian 13. The editor opens with the installation settings.
Check the disks, RAID and server name
These lines should look like this; change the name in
HOSTNAMEto your own:DRIVE1 /dev/nvme0n1 DRIVE2 /dev/nvme1n1 SWRAID 1 SWRAIDLEVEL 1 HOSTNAME pve1.example.comThe server name must be in the name.domain format: Proxmox requires exactly this kind of name.
Replace the partitions with LVM
Find the lines that start with
PART(without#in front) and replace them with these four. The one exception is thePART /boot/efi esp 256Mline: if it is there, keep it first and put the four lines after it.PART /boot ext3 1024M PART swap swap 8G PART lvm vg0 all LV vg0 root / ext4 100GThe system takes 100 GB in the
vg0volume group, and later we give the free space in it to virtual machine disks. Leave the other lines of the file unchanged. What each line means is explained in the article installimage: RAID and partitioning.Save the settings and wait for the installation
F2 saves the file, F10 closes the editor (on a Mac, Fn+F2 and Fn+F10, or Esc, then 2, and Esc, then 0). Confirm the data deletion and wait for the
INSTALLATION COMPLETEmessage. Then reboot the server:reboot
After 2–3 minutes the server boots into Debian 13. Next, prepare it for the Proxmox installation.
Prepare Debian: password, RAID and server name
Log in to the new system
ssh root@203.0.113.10The password is the same as the Rescue one. If SSH says
REMOTE HOST IDENTIFICATION HAS CHANGED, runssh-keygen -R 203.0.113.10on your computer and connect again: the new system has its own key.Set the root password
passwdYou will log in to the Proxmox web interface with this password. The interface is reachable from the internet, so the password must be long and not used anywhere else.
Check the RAID and the volume group
cat /proc/mdstat vgsmdstatshould showraid1arrays made ofnvme0n1andnvme1n1. Aresyncline means background syncing; you do not need to wait for it to finish. Thevgsoutput should list thevg0group, with almost the whole disk capacity minus the 100 GB for the system in theVFreecolumn.Check that the server name points to its IP
hostname --ip-addressThe output should be
203.0.113.10, possibly with an IPv6 address next to it. If you see127.0.1.1or an error instead, the Proxmoxpve-clusterservice will not start. Fix the/etc/hostsfile (with your own name) and check again:sed -i '/^127\.0\.1\.1/d' /etc/hosts echo "203.0.113.10 pve1.example.com pve1" >> /etc/hostsThe first command deletes the line with
127.0.1.1, the second adds a line where the server name points to its main IP.
Once hostname --ip-address shows the main IP, Debian is ready for Proxmox.
Install Proxmox VE 9 from the official repository
Add the Proxmox repository
apt update && apt install -y wget
wget https://enterprise.proxmox.com/debian/proxmox-archive-keyring-trixie.gpg -O /usr/share/keyrings/proxmox-archive-keyring.gpg
cat > /etc/apt/sources.list.d/pve-install-repo.sources <<'EOF'
Types: deb
URIs: http://download.proxmox.com/debian/pve
Suites: trixie
Components: pve-no-subscription
Signed-By: /usr/share/keyrings/proxmox-archive-keyring.gpg
EOF
The first line installs
wget, the second downloads the key that signs the Proxmox packages. Thecat … EOFblock creates the file for the freepve-no-subscriptionrepository for Debian 13. Copy it whole, fromcatthroughEOFinclusive.Update the system and install the Proxmox kernel
apt update && apt full-upgrade -y
apt install -y proxmox-default-kernel
reboot
If a window asking which disks to install GRUB on appears during the installation, select both disks
/dev/nvme0n1and/dev/nvme1n1with the space bar (the whole disks, not partitions) and press Enter.Install the Proxmox VE packages
After 2–3 minutes, connect again and check the kernel:
uname -rThe kernel name must end in
-pve. Now install Proxmox itself:apt install -y proxmox-ve postfix open-iscsi chronyIn the Postfix configuration window, choose Local only and keep the default name.
Remove the Debian kernel
apt remove -y linux-image-amd64 'linux-image-6.12*' os-prober
update-grub
reboot
The standard Debian kernel is no longer needed.
os-proberlooks for systems on all partitions and may add virtual machine disks to the server’s boot menu, so we remove it too.update-grubrebuilds the boot menu.Open the web interface
Open
https://203.0.113.10:8006in your browser: https and port 8006 exactly. The browser warns about the certificate, and that is expected: Proxmox created the certificate itself. Open the page through the advanced options of the warning.The user is
root, in the Realm field choose Linux PAM standard authentication, and the password is the one you set withpasswd. Close the No valid subscription window with the OK button: it does not affect how Proxmox works.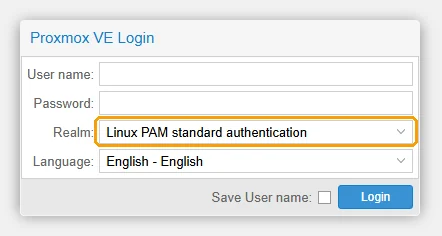
Proxmox login: user root, Realm Linux PAM standard authentication, the password from the passwd command. Create storage for VM disks
lvcreate -l 95%FREE --thinpool data vg0
pvesm add lvmthin local-lvm --vgname vg0 --thinpool data --content images,rootdir
pvesm status
The first command creates a thin pool
datain the free space ofvg0, the second adds it to Proxmox as thelocal-lvmstorage. Thepvesm statusoutput should listlocal(for ISO images and backups) andlocal-lvm(for VM disks), bothactive.
Proxmox is running. All that is left is to set up the network the virtual machines use to reach the internet.
Why you must not bridge VMs to the network card
Hetzner binds IP addresses to the server’s MAC address. In the usual Proxmox setup (bridged), VMs are bridged directly to the network card, and each one has its own MAC. Hetzner treats traffic from such MACs as a violation: it sends an abuse complaint and may block the server. The complaint comes to us, and we forward it to you (what to do with a complaint).
That is why we build the network as a routed setup. The VMs connect to an internal bridge vmbr0 that is not tied to the network card, and the server itself passes their traffic out from its own MAC. You do not need to order virtual MACs in Robot for this.
When a bridged setup with virtual MACs fits
A single additional IP can get a virtual MAC in Robot: you set that MAC in the network card settings of the VM and bridge the VM to the server’s network card. This works for no more than 6 single IPs per server. Subnets and failover IPs do not work in a bridged setup, only in a routed one. If your Robot login has no button for virtual MACs, message us.
Set up a routed network for additional IPs
Do not touch the main network card in the /etc/network/interfaces file: the Hetzner installer has already configured it. We only append a new bridge to the end of the file.
A mistake in the network settings will cut off SSH access to the server. In the first step you save a copy of the file, and if access is lost, you restore it from Rescue as shown at the end of the article.
Save a copy of the settings and add the vmbr0 bridge
Copy and paste the whole block, from the
cpline to theEOFline. There must be as manypost-up ip route addlines as you have additional IPs:cp /etc/network/interfaces /root/interfaces.backup cat >> /etc/network/interfaces <<'EOF' auto vmbr0 iface vmbr0 inet static address 203.0.113.10/32 bridge-ports none bridge-stp off bridge-fd 0 post-up echo 1 > /proc/sys/net/ipv4/ip_forward post-up echo 1 > /proc/sys/net/ipv4/conf/vmbr0/proxy_arp post-up ip route add 203.0.113.20/32 dev vmbr0 post-up ip route add 203.0.113.21/32 dev vmbr0 post-up ip route add 203.0.113.22/32 dev vmbr0 EOFLine What it does auto vmbr0Brings the bridge up when the server boots. iface vmbr0 inet staticA bridge with a static IPv4 address. address 203.0.113.10/32The server’s main IP on the bridge: it will be the gateway for the VMs. The /32 mask keeps a second route to the server’s network from appearing. bridge-ports noneThe bridge is not connected to the network card, so the VMs’ MAC addresses never reach the Hetzner network. bridge-stp off,bridge-fd 0Turn off the STP protocol and the delay when the bridge starts: a bridge without ports does not need them. post-up echo 1 > …/ip_forwardTurns on packet forwarding between the VMs and the outside network. On a Hetzner installation it is off by default. post-up echo 1 > …/proxy_arpThe server answers the VMs’ ARP requests for addresses in its network, so the VMs reach neighboring addresses through it. post-up ip route add 203.0.113.20/32 dev vmbr0A route to an additional IP through the bridge. One line per address. Apply the settings
ifreload -aIf the command prints a warning about
route addorFile existsfor the main network card, there is nothing to worry about: this happens when the route already exists. If the reply iscommand not found, apply the settings with a reboot:reboot.Check the routes and packet forwarding
ip route | grep vmbr0
cat /proc/sys/net/ipv4/ip_forward
The first command should show three routes: to
203.0.113.20,203.0.113.21and203.0.113.22. While no VM is running, the wordlinkdownmay appear next to them; that is normal. The second command should print1. If something is missing, reboot the server and check again.
The bridge is ready, and you can now connect virtual machines to it.
Create a VM and set the IP inside it
Upload an ISO image of the system
In the web interface, select the local storage on the left, then ISO Images. The Upload button uploads an image from your computer, and Download from URL fetches it from a direct link to the ISO. The second way is faster: the server downloads the file itself.
Create a VM with the Create VM button
The Create VM button is at the top right. In the wizard, set:
- the Disks tab: Storage
local-lvm; - the CPU tab: Type
host; - the Network tab: Bridge
vmbr0, ModelVirtIO.
For Windows, choose the Intel E1000 model on the Network tab and the SATA bus on the Disks tab. Then the Windows installer sees the disk and the network without extra drivers.
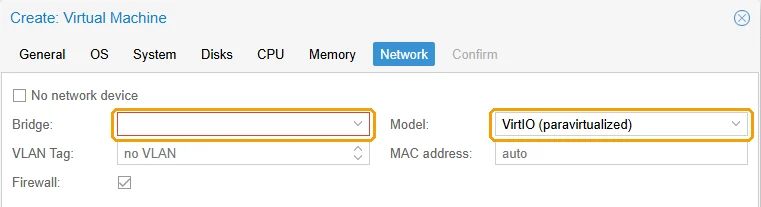
Choose vmbr0 in Bridge. If the field is empty and outlined in red, as here, the bridge does not exist yet: add it with the steps above first. For Windows, choose Intel E1000 instead of VirtIO. - the Disks tab: Storage
Set the network manually when installing the system in the VM
Field Value in the example IP address 203.0.113.20; for the second VM203.0.113.21, for the third203.0.113.22Netmask 255.255.255.192; in the Ubuntu installer, the Subnet field:203.0.113.0/26Gateway 203.0.113.10, the server’s main IPDNS the addresses from the nameserverlines in the/etc/resolv.conffile on the server:grep nameserver /etc/resolv.confTake the netmask from the IP address details we send you. The gateway in the VM is the server’s main IP, not the gateway from those details (
203.0.113.1in the example): that one works only for the server itself. Use each IP in one VM only.If the additional IP is outside the main IP’s network
In the example, the main IP’s network is
203.0.113.0/26, that is, the addresses from203.0.113.1to203.0.113.62. If an additional IP is outside it, the gateway203.0.113.10ends up outside the VM’s network, and the installer may reject it. In that case, give the Linux VM an address with a /32 mask and specify that the gateway is directly reachable. Theip linkcommand shows the name of the network card in the VM; in Proxmox it is usuallyens18.Debian, the
/etc/network/interfacesfile inside the VM:auto ens18 iface ens18 inet static address 192.0.2.25 netmask 255.255.255.255 pointopoint 203.0.113.10 gateway 203.0.113.10Ubuntu, a file in
/etc/netplan/inside the VM:network: version: 2 ethernets: ens18: addresses: [192.0.2.25/32] routes: - to: default via: 203.0.113.10 on-link: trueOn the server, such an address needs the same kind of route line in
vmbr0:post-up ip route add 192.0.2.25/32 dev vmbr0.Check the internet connection inside the VM
ping -c 3 one.one.one.oneIf replies come back, the network works. If it says the name cannot be resolved, check the DNS. If the VM has no internet after you change its network settings, shut it down completely with the Stop button and start it again with the Start button.
The other VMs are set up the same way: each gets its own additional IP and the same gateway.
If you have a subnet instead of single IPs
Hetzner routes a subnet to the server’s main IP, so it needs no separate gateway. A separate bridge vmbr1 is more convenient for it: the server takes one address of the subnet and becomes the gateway for the VMs. An example for the 198.51.100.0/29 subnet:
cat >> /etc/network/interfaces <<'EOF'

auto vmbr1
iface vmbr1 inet static
    address 198.51.100.1/29
    bridge-ports none
    bridge-stp off
    bridge-fd 0
    post-up echo 1 > /proc/sys/net/ipv4/ip_forward
EOF
ifreload -a
Connect the VMs to the vmbr1 bridge and give them IPs from 198.51.100.2 to 198.51.100.6, the netmask 255.255.255.248 and the gateway 198.51.100.1. Of the eight addresses in a /29, five are left for VMs: the first is the network address, the last is the broadcast address, and one more is taken by the server.
More VMs than IPs: internet access through NAT
VMs without their own IP can reach the internet through the server’s main IP. They need one more bridge with an internal network. First, find the name of the server’s network card: it comes after the word dev in the output of this command:
ip route show defaultIn the example it is enp0s31f6; replace it with yours in the block below:
cat >> /etc/network/interfaces <<'EOF'

auto vmbr2
iface vmbr2 inet static
    address 10.10.10.1/24
    bridge-ports none
    bridge-stp off
    bridge-fd 0
    post-up echo 1 > /proc/sys/net/ipv4/ip_forward
    post-up iptables -t nat -A POSTROUTING -s 10.10.10.0/24 -o enp0s31f6 -j MASQUERADE
    post-down iptables -t nat -D POSTROUTING -s 10.10.10.0/24 -o enp0s31f6 -j MASQUERADE
EOF
ifreload -a
The iptables lines replace the VM’s internal address with the server’s main IP when traffic leaves the server. In the VMs on the vmbr2 bridge, set IPs from 10.10.10.2 to 10.10.10.254, the netmask 255.255.255.0, the gateway 10.10.10.1 and DNS from the server’s /etc/resolv.conf. These VMs cannot be reached from outside until you forward ports to them.
If something does not work
| What you see | What to do |
|---|---|
| The server does not respond over SSH after the installation or a reboot | Wait 5 minutes. If there is no access for more than 10 minutes, activate Rescue and reboot the server; after that you can repeat the installation. If that does not help, message us: we will request a KVM console to see the server’s screen (about the KVM console). |
| installimage shows an error | Check that the PART and LV lines are written exactly as in the example, with no extra characters, and that SWRAID 1 is set. If the error repeats, save debug.txt and send it to us together with the error text. |
| The web interface does not open | The address must be https://203.0.113.10:8006. Check the services with systemctl status pveproxy pve-cluster: both should be active (running). If pve-cluster does not start, the server name is almost always the cause: see the name check. If the Robot firewall is turned on for the server, allow incoming TCP port 8006 in it or turn the firewall off for a while. |
| The web interface rejects the password | The user is root, the Realm is Linux PAM standard authentication, not Proxmox VE authentication server. You can set the password again with passwd. |
apt update returns a 401 error for enterprise.proxmox.com | This is the paid repository, and you do not need it. Turn it off: mv /etc/apt/sources.list.d/pve-enterprise.sources /etc/apt/sources.list.d/ceph.sources /root/ 2>/dev/null; apt update |
When you start a VM: KVM virtualisation configured, but not available | Run grep -cE 'vmx|svm' /proc/cpuinfo. If the output is 0, hardware virtualization is turned off in the BIOS. Message us: we will ask Hetzner to turn it on. |
| In the Create VM wizard, the Bridge field is empty and outlined in red | The server has no vmbr0 bridge yet. Add it with the routed network steps, apply the settings with ifreload -a and open the wizard again. |
| The VM has no internet | Check in this order: on the server, ip route | grep vmbr0 shows routes to all your IPs, and cat /proc/sys/net/ipv4/ip_forward prints 1; in the VM settings (Hardware, Network Device), bridge=vmbr0 is set; inside the VM, the gateway is the server’s main IP, and the netmask and IP are correct; after the network change, the VM was shut down completely with Stop and started again. |
| A Hetzner complaint about foreign MAC addresses arrived | Some VM is bridged directly to the server’s network card. Check that the bridges in /etc/network/interfaces have bridge-ports none and that all VMs are connected only to them. |
If you lose access to the server after setting up the network, activate Rescue and reboot the server, as at the start of the article. In Rescue, restore the saved copy of the settings and reboot:
mdadm --assemble --scan
vgchange -ay vg0
mount /dev/vg0/root /mnt
cp /mnt/root/interfaces.backup /mnt/etc/network/interfaces
umount /mnt
reboot
The commands assemble the RAID arrays, activate the volume group, mount the system root and restore the network file from the copy. If you get stuck at a step, send us the step number and the output of the last command as text.
FAQ
Can I install Proxmox from an ISO through the KVM console?
Do I need to order virtual MAC addresses?
Proxmox shows a No valid subscription window. Do I need a subscription?
How do I give my virtual machines IPv6?
Did this guide help?
Thank you! This tells us which guides work.
What went wrong?
Tell support at which step you got stuck and include the link to this guide, so you don’t have to explain from scratch.