


Hetzner Robot
How to reinstall Linux on a Hetzner server with installimage
A reinstall puts a clean system on the server: Ubuntu, Debian, AlmaLinux or another distribution from the Hetzner list. You need it when the server arrived in the Rescue System with no OS, the system is broken, or you want a different version.
In short
- A reinstall wipes the server’s disks. Copy the files you need first.
- The route that works with the Robot login from ABCD: Serveryour serverRescue, then a reboot in the Reset tab, an SSH login and the
installimagecommand. - The root password of the new system is the same as the Rescue password. On the first login, SSH warns that the server’s key has changed: that is expected.
- Faster: the Linux tab in Robot installs the system without the command line, with the standard disk layout.
Contents
You will need
- The Hetzner Robot login from ABCD: it came with your server’s details.
- An SSH client. Windows 10 and 11, macOS and Linux have one built in: how to connect to a server via SSH.
- 15–20 minutes and a copy of your important data.
- No server yet? See Hetzner servers in our catalog.
What a reinstall erases
The installation completely wipes the disks listed in the installer settings, and that list usually includes every disk in the server. Files, databases and settings cannot be recovered afterwards. Copy what you need beforehand: over SSH as usual while the system still boots, or from the Rescue System if it no longer does (how to get files out in Rescue).
The Rescue System itself does not touch your data: it boots over the network and runs in memory. Only the installation wipes the disks. If one of the disks must stay untouched, you will have to change the installer settings by hand: installimage with RAID and custom partitioning.
Reinstalling via Rescue and installimage
This route works with the Robot login that ABCD gives you: it lets you activate Rescue and reboot the server. installimage is the Hetzner installer. It runs in the Rescue System and installs the system from Hetzner’s standard images.
Activate the Rescue System
Log in to Robot at robot.hetzner.com and open Serveryour serverRescue. Select the Linux option marked stable and click Activate rescue system.
Robot shows the Rescue password. Copy it right away: you log in to Rescue with it, and it also becomes the root password of the new system.
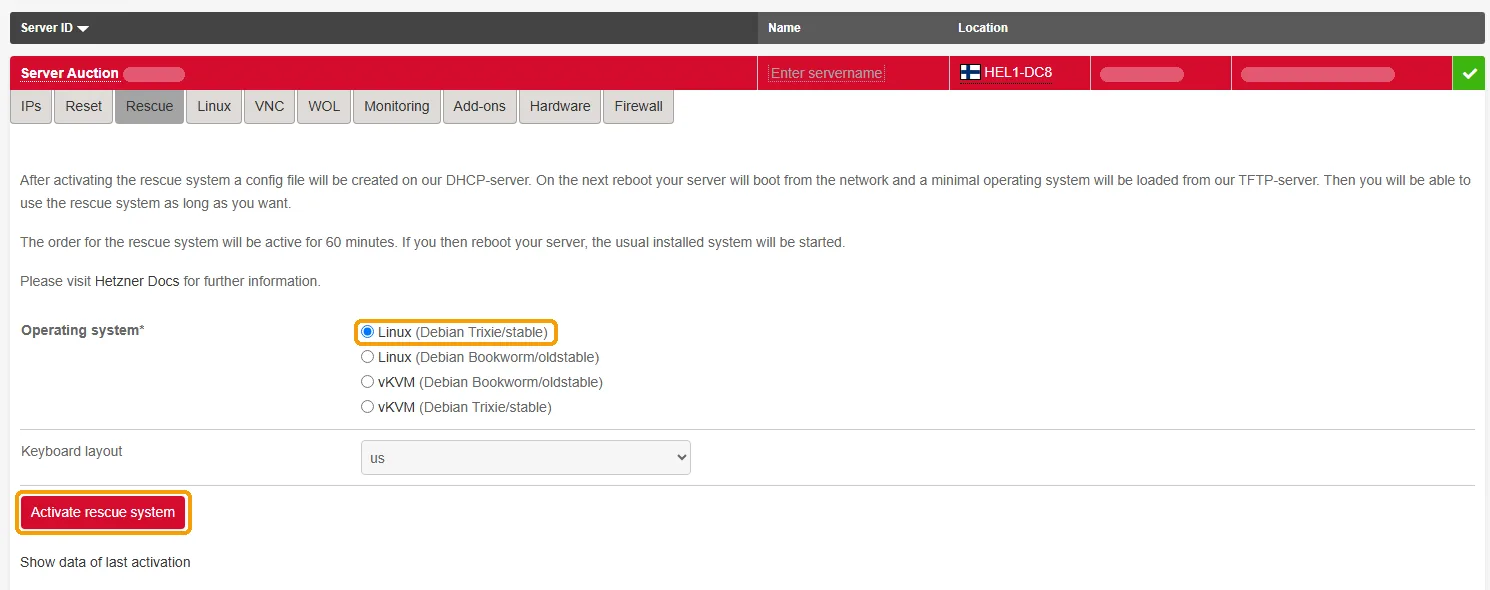
The Rescue tab: select Linux and click Activate rescue system. The password appears after activation. If the server has just been delivered and is already running the Rescue System, you can skip this step and the next one: connect with the password from your server details. If the password does not work, activate Rescue again.
Reboot the server in the Reset tab
Activation only schedules a Rescue boot for the next server start, so you need to reboot the server. Open the Reset tab, choose a hardware reset and send the request. The difference between the options is explained in the article on rebooting a Hetzner server.
Reboot the server within 60 minutes of activation. After that the activation expires, and the server boots from its disks again.
Connect to Rescue via SSH
2–3 minutes after the reboot, connect to the server’s main IP as root and enter the Rescue password:
ssh root@203.0.113.10Replace 203.0.113.10 with your server’s IP. If SSH says
REMOTE HOST IDENTIFICATION HAS CHANGED, that is expected: Rescue has its own server key. Remove the old key entry on your computer and connect again:ssh-keygen -R 203.0.113.10Wipe the old disk layout
If the server already had a system on it, Hetzner recommends stopping the old software RAID and wiping the partition tables before the installation. First, see which disks the server has:
lsblkNVMe disks are named
nvme0n1,nvme1n1, SATA diskssda,sdb. For NVMe, run:mdadm --stop /dev/md* wipefs -fa /dev/nvme*n1The first command stops the old RAID arrays, the second wipes partition and file system signatures from the disks. For SATA disks the second command is different:
wipefs -fa /dev/sd*. If the server has disks of both types, run both. When there are no old arrays, mdadm replies with aNo such file or directoryerror; it does not affect the installation. If one of the disks must be kept, do this step as described in the article installimage with RAID and custom partitioning: there you wipe only the disks you choose.Run installimage and choose a system
installimageA menu opens: choose the distribution first, then the version. Use the arrow keys and Enter to pick items. The image name contains the version number or its code name: for Debian 13, for example, that is trixie.
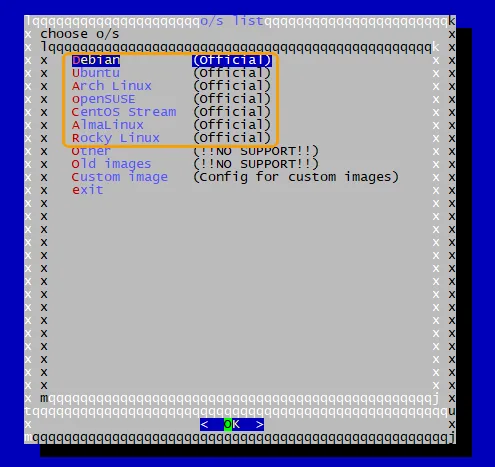
The installimage menu: choose a distribution with the arrow keys, and Enter opens the list of its versions. Hetzner’s standard images as of November 2026:
Distribution Versions Ubuntu LTS 22.04, 24.04, 26.04 Debian 12 (bookworm), 13 (trixie) AlmaLinux 8, 9, 10 Rocky Linux 8, 9, 10 CentOS Stream 9, 10 openSUSE Leap 16.0 Arch Linux latest (Minimal) Choose the system your software is built for. Older versions are under Old images, but Hetzner does not support them.
Check the settings in the editor
Once you choose an image, installimage opens its settings file in a text editor. For a regular installation you hardly need to change anything: the installer has already filled in the disk list and the partitioning. Just enter the server name on the
HOSTNAMEline, for example:HOSTNAME server.example.comLeave the other lines as they are. Lines that start with
#are comments and examples; the installer does not read them.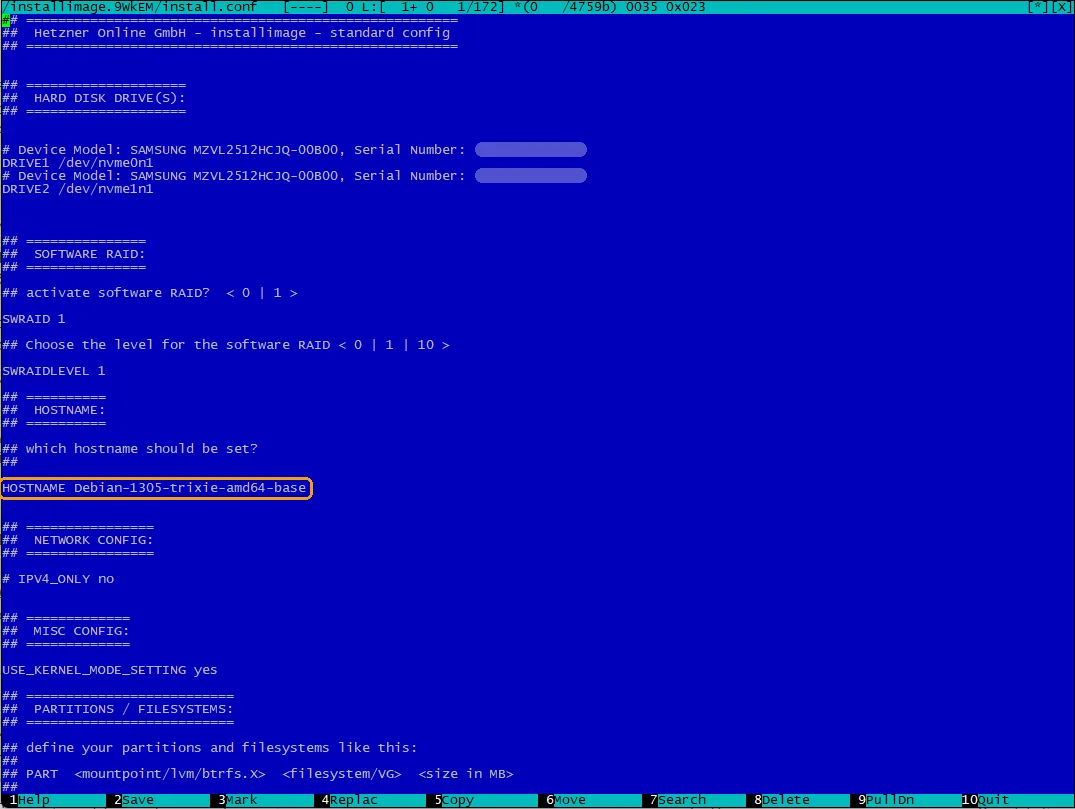
In a regular installation, only HOSTNAME changes. The disks on the DRIVE lines will be wiped. What the other lines mean
DRIVE1,DRIVE2and so on are the disks the system will be installed on. Each of them will be wiped.SWRAID 1turns on software RAID across these disks, andSWRAIDLEVELsets its level: 1 is a mirror, 0 combines the disks with no protection against a disk failure.The
PARTlines describe the partitions: mount point, file system and size.A different RAID level, a system without a /home partition, or LVM are set on these same lines: ready-made settings for common cases.
Save the file and confirm the installation
Press F2 to save the file and F10 to close the editor. If the F keys do not work (this happens on a Mac), press Fn+F2 and Fn+F10. Another way: Esc, then 2 saves the file; Esc, then 0 closes the editor.
installimage checks the settings. If there is a mistake, the installer takes you back to the editor. If everything is fine, it warns that the data on the disks will be deleted: confirm. The installation takes a few minutes, and at the end the installer prints
INSTALLATION COMPLETE.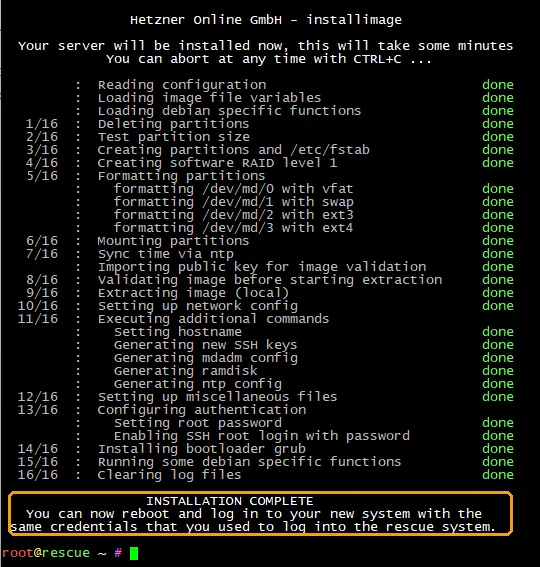
The installation is finished. Log in to the new system with the same password or key as in the Rescue System. Reboot the server into the new system
rebootRescue is active for one boot only, so after the reboot the server starts from its disks, with the new system. You do not need to turn Rescue off in Robot.
In 2–3 minutes the system is ready for the first login. How to log in and what to check is covered below.
Faster: the Linux tab
The server page in Robot has a Linux tab for automatic installation: Hetzner installs the chosen standard image itself, with no command line. If you do not have this tab, install the system with installimage as described above.
Choose a system in the Linux tab
Open Serveryour serverLinux and select a distribution under Operating system. Tick I am aware that the Linux installation will erase all data on all drives of my server: it confirms that all disks will be wiped. Then click Activate Linux installation. If Robot shows a root password, save it.
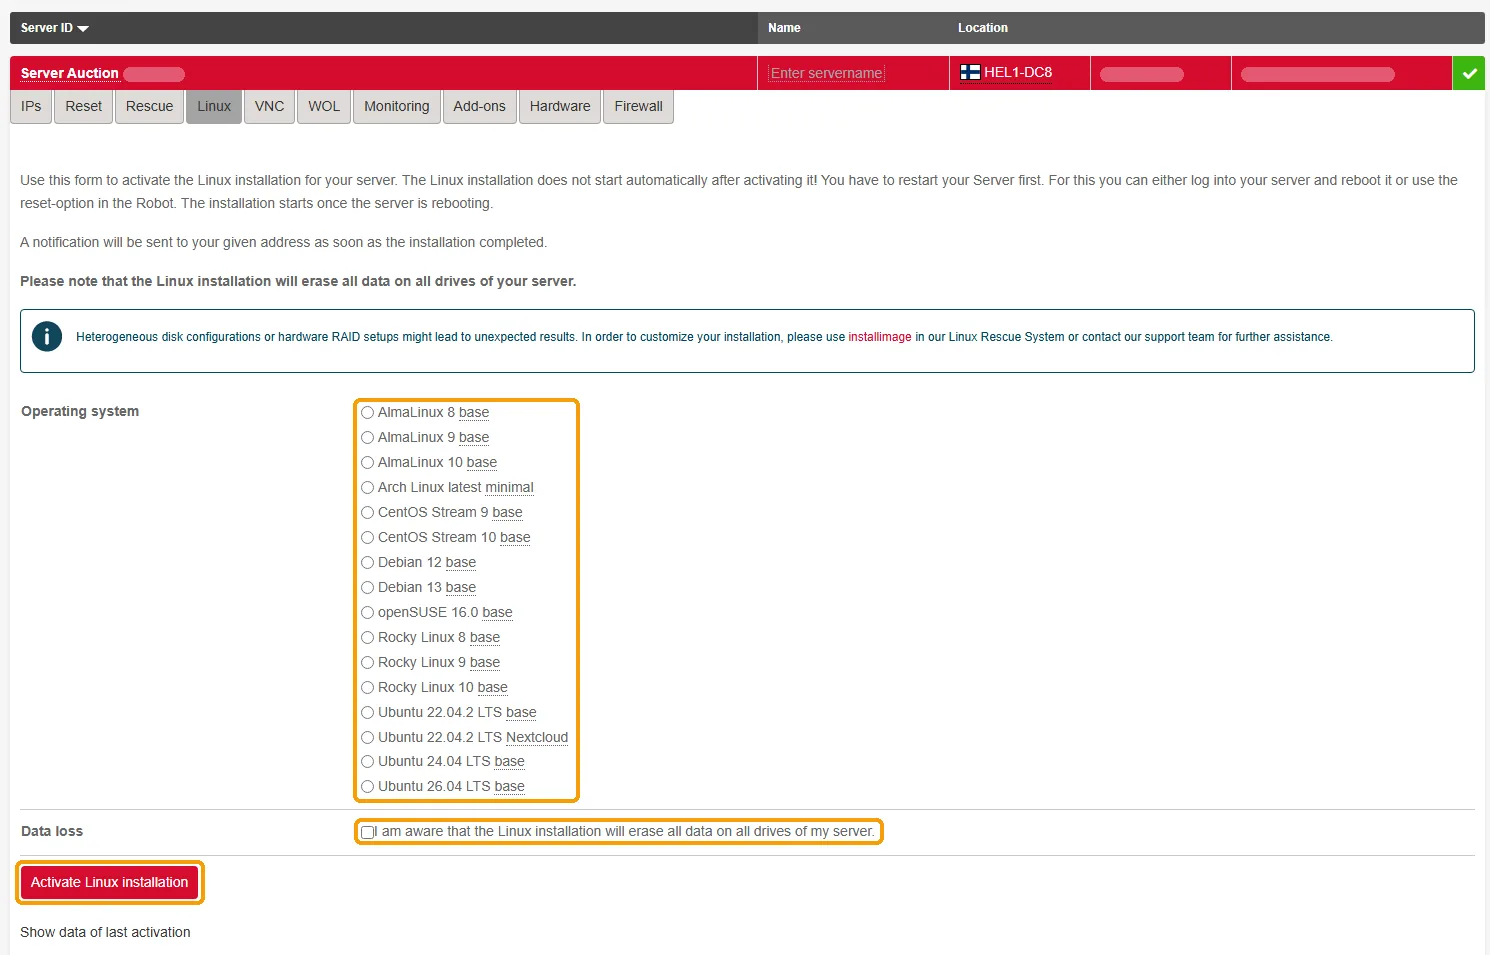
The Linux tab: select a system, tick the checkbox, click Activate Linux installation, then reboot the server. Reboot the server in the Reset tab
As with Rescue, the installation starts after a reboot. From there, Hetzner does everything itself. This installation wipes the disks just as installimage does.
Wait a few minutes and connect via SSH as described in the next section. Custom partitioning and the RAID level are set in installimage: how to do it.
First login to the new system
Connect the same way as to Rescue:
ssh root@203.0.113.10SSH warns about a changed key again: the new system has its own key, different from the Rescue one. Remove the old entry with ssh-keygen -R 203.0.113.10 and connect again. More about this warning in the article on connecting to a server via SSH.
After an installation with installimage, the root password is the same as the Rescue password. Change it to your own:
passwdThe command asks for the new password twice. The characters do not show as you type; that is by design.
How to check that the system is installed
cat /etc/os-release
lsblk
The first command shows the system name and version on the PRETTY_NAME line, the second shows the disks and partitions. If the installer set up software RAID, check it too:
cat /proc/mdstatThe word resync in the output means the array is syncing the disks in the background. That is normal, and you can already use the server.
If something went wrong
| What you see | What to do |
|---|---|
| After the reboot the old system booted, not Rescue | More than 60 minutes passed since activation, or the reboot did not go through. Activate Rescue again and reboot the server right away. |
Permission denied, please try again. when logging in to Rescue | Make sure you enter the password from the latest Rescue activation, with no spaces at either end. If that does not help, activate Rescue again and reboot the server. |
REMOTE HOST IDENTIFICATION HAS CHANGED | The server key changed after Rescue or the installation. On your computer, run ssh-keygen -R followed by the server’s IP, then connect again. |
| installimage takes you back to the editor | There is a mistake in the settings. Check the lines you changed, save the file and close the editor again. |
| The installation stopped with an error | Run installimage again. If the error repeats, save the file /root/debug.txt before rebooting and send it to us together with the error text: how to save debug.txt. |
| After the reboot the server does not respond for more than 10 minutes | Activate Rescue and reboot the server. If Rescue boots, repeat the installation. If it does not, ask us in a ticket for a KVM console to see the server’s screen: how to get a KVM console. |
| Robot does not open | This can happen because of restrictions on your internet provider’s side. You can ask us in a ticket or on Telegram to activate Rescue, reboot the server or reinstall the system. |
If you get stuck at a step, send us the step number and the output of the last command as text: it helps us see what happened faster.
FAQ
Will the Rescue System erase my files?
What is the root password of the new system?
passwd on the first login.My server arrived booted into the Rescue System. What should I do?
Can I install Windows this way?
Did this guide help?
Thank you! This tells us which guides work.
What went wrong?
Tell support at which step you got stuck and include the link to this guide, so you don’t have to explain from scratch.